Check your access first
Open copilotstudio.microsoft.com with your work account. Make sure you’re in the organization and environment where you’re allowed to build. An environment is the workspace that holds your agent and its connections.
For a first attempt, use a test mailbox with a few made-up emails. You’ll build an Executive Assistant that finds messages needing a reply and writes drafts in chat for you to review.
Check billing before you test. Microsoft’s New experience uses Copilot Credits during building and testing as well as live use. Opening Studio does not prove everything is included in your existing license. Ask your administrator which environment and usage allowance to use.
Microsoft: Agent Builder and Studio comparison · Usage-based billing.
Start in the New experience
- Turn on New experience if you see that switch, as shown in the video.
- Select Agent, the option for creating an agent that takes actions and answers questions. You can also use Agents → New agent.
- On the Build tab, name it Executive Assistant. Give it a short description: “Find messages that need my reply and prepare drafts for review.”
- Save your agent.
Microsoft’s current documentation calls the engine behind this experience the GitHub Copilot harness. You don’t need to write code for this walkthrough. If your screen shows a different builder or the option is missing, check with your administrator before following instructions for another experience.
Microsoft: Create a new agent · Copilot Studio experiences.
Give it one clear job
The instructions are the agent’s job description. Explain what it should do, what it should return, and where it should stop. Paste this example into Instructions, then adjust it for your work.
This is a starting template for the guide, not a claim that the agent will get every decision right. The tests below check whether it follows the instructions.
Microsoft: Configure instructions.
Choose a model for the job
Open the Model list in the components panel. The video selects a reasoning model. If your environment offers one, try it on a thread where the agent has to work out whether a reply is still needed.
The recording shows GPT-5.6 Reasoning. Use an available, approved model in your own environment rather than assuming that exact option will appear. Keep the same five test prompts when comparing models. Check which one reaches the right answer, follows the boundary, responds promptly, and uses an acceptable number of credits. A more capable model can still make a wrong call.
Model availability depends on your environment and administrator settings. Check labels: Microsoft advises against using experimental or preview models for production agents.
Microsoft: Select an agent model.
Connect Outlook, then check what it can do
- Select Tools in the components panel. Browse or search for Outlook and select Mail MCP, the option shown in the video.
- Open its details and read the available actions. MCP is a standard way to give an agent access to tools; the action list tells you what this particular connection can do.
- Choose Add and follow the Microsoft sign-in and connection prompts. Verify the account belongs to the mailbox you intend to test.
- Where the tool allows action selection, enable only the actions you need. For this exercise, start with searching and reading mail.
- Save. In Preview, ask it to locate one made-up test message by subject. Confirm it finds the correct message.
Instructions don’t remove a tool’s permissions. If the connection exposes send or delete actions that you can’t disable, use a test mailbox or an approved read-only connector for this exercise. Keep the first output as draft text in chat.
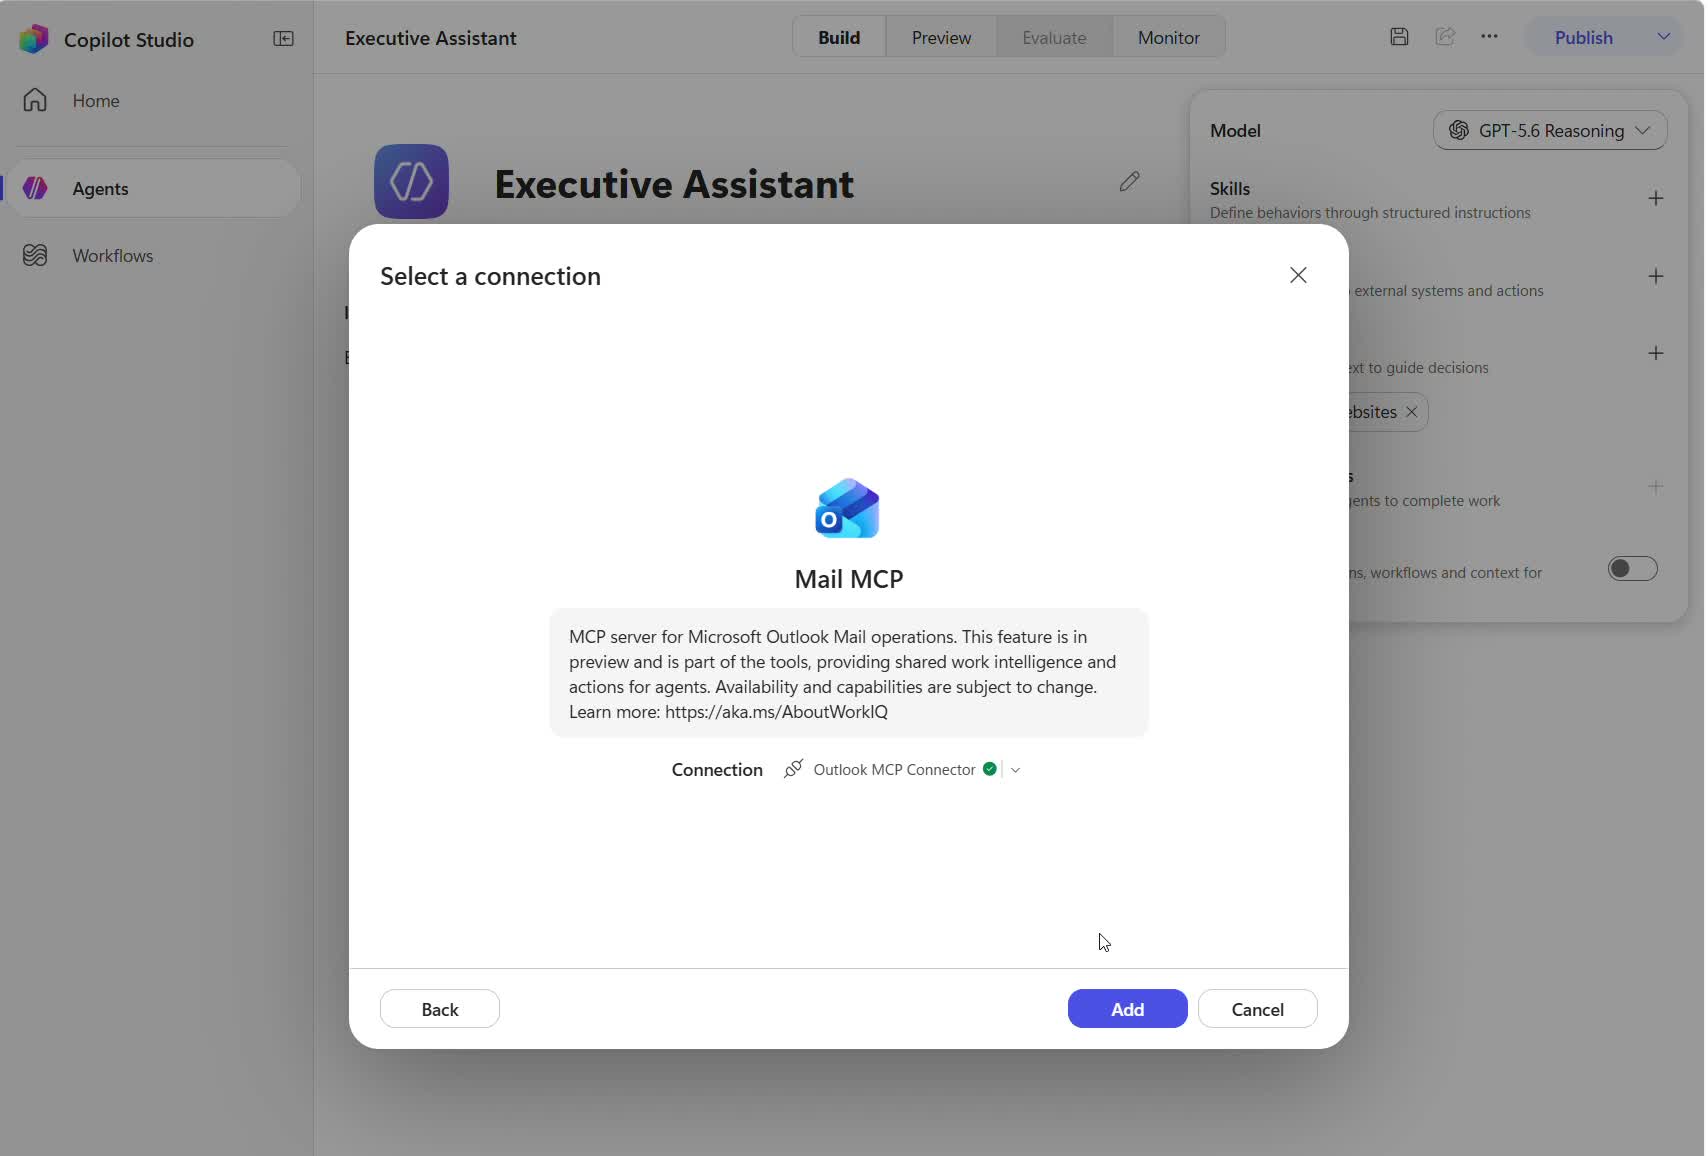
If Mail MCP (Outlook) isn’t in your catalog, check with your administrator. Microsoft also supports Outlook connector actions. The available tools and consent requirements can differ between organizations.
Microsoft: Add a tool · Available tool types. The Mail MCP name and preview label are visible in the recording.
Remember useful preferences
On Build, use the Memory toggle. To test it, say: “Remember that I prefer reply drafts under 100 words.” Start a new conversation and ask for a draft. Then ask what it remembers and ask it to forget the preference.
Memory is a preview feature. Microsoft keeps it separate for each user; it isn’t shared team knowledge. It is disabled in group chats and Teams channels. Turning the toggle off stops its use but does not delete stored memories. Users can review and remove their memories through chat or the memory portal.
You can finish this walkthrough with one agent. When you have a separate job to delegate, follow the connected-agent example below.
Microsoft: Memory.
Run these five tests in Preview
Use made-up messages so you already know the answer. Set up one unanswered request, one thread you already replied to, and one newsletter. Use a fresh conversation when you need to remove the previous chat’s context.
Use the activity trace to inspect source and tool calls. Check the actual mailbox too. A convincing “done” message is not evidence that the intended action happened.
When you want it to take action
After the draft-only version passes, you can add an approved action such as creating a draft in Outlook. Change the instructions to name that exact action and when you authorize it, then test the result in your test mailbox. Sending email is a separate step: use a configured approval or confirmation control that shows the recipient, subject, body, and attachments before sending. An instruction that says “ask first” is not a substitute for that control.
Microsoft: Preview and test an agent. The test cases above are Wasser AI’s suggested checks.
Publish, open it, then monitor it
- Save the version that passed your tests.
- Open the dropdown next to Publish. Review the name, description, instructions, and available channels.
- Select Teams + Microsoft 365, the combined channel shown in the video. Keep authentication enabled for this mailbox assistant. Configure the channel. Follow your organization’s sharing and approval process.
- Select Save and publish (or Publish, depending on your interface) and wait for confirmation.
- Open the agent in the channel you chose. Repeat a test there to check the actual user experience and account connection.
Publishing a version and distributing it to people are separate steps. Start with a small test group. Changes you make later remain in draft until you publish again.
Once the agent is published and receiving activity, open Monitor. Review recent sessions, failed tool calls, feedback, and Copilot Credit usage. If a response looks wrong, open the session and inspect what happened before changing the instructions.
Microsoft: Publish an agent · Available channels · Monitor an agent.
What else can your agent do?
Outlook is one starting point. An agent can work across systems, follow a reusable method, ask another agent for help, or call a workflow. Choose the piece that solves your next problem.
| Component | What it adds | Example |
|---|---|---|
| Knowledge | Reference material to answer from. | An approved policy document. |
| Tools | Access to data and actions in a system. | Look up a customer record. |
| Skills | A reusable method for doing a particular job. | Turn a messy inbox into a consistent briefing. |
| Connected agents | A specialist with its own instructions and setup. | Ask a policy agent to check a proposed reply. |
| Workflows | A defined sequence of steps and business rules. | Create a request, route it for approval, then update its status. |
They work together. A skill can tell your assistant how to prepare a briefing, while a tool retrieves the mail. A workflow can decide what must happen before a record is updated.
When you add a new job, update the main instructions too. The starter above is deliberately scoped to email. Name the additional system and the exact action you want to allow, such as looking up a request or logging a follow-up. Keep the draft-only email boundary unless you intentionally change that job.
Microsoft: Skills and other components · Tool types. Business examples in this section are suggested starting points.
Connect the systems your work already uses
In Build → Tools, use the Connectors, MCP, or Workflows tab. A connector usually exposes individual actions for an app. An MCP server can offer a collection of related tools, like the Outlook example in the video.
- SharePoint: retrieve a file or work with list records. For an assistant that only answers policy questions, a knowledge source may be enough; updating a list needs an action.
- Salesforce or Dynamics 365: retrieve an account or opportunity before preparing a customer briefing. Add record updates separately when you have a clear use for them.
- ServiceNow: look up a request’s status or create a ticket with the fields your service desk requires.
- SAP or an internal service: retrieve an approved business record through an available connector or MCP server. Your administrator or developer may need to set up that connection.
These are examples of what connected systems can support. Your catalog, selected actions, service subscription, and account permissions determine what your agent can actually do.
Try one extra tool
- Pick one task, such as “look up the status of request 123.” Search the catalog for that system and inspect the action list.
- Add the lookup action and connect the intended account. Start with a record whose correct status you already know.
- Give the tool a specific description: “Look up a service request by its ID and return its current status.”
- Test the known ID, an unknown ID, and a request with no ID. Check the returned record and the activity trace.
Microsoft: Add and describe tools · Supported tool types and services · Power Platform connector background.
Package a repeatable job as a skill
Your main instructions describe the assistant’s overall job. A skill gives it a focused method to use when a matching task comes up. You might have separate skills for an inbox briefing, meeting preparation, and a weekly account summary.
A skill has a name, a description of when to use it, and instructions. It can also include reference files, templates, or scripts. Adding a skill does not connect a mailbox or grant access to another system. The required tools still need to be connected.
- Open Skills and choose Create from blank.
- Name the skill
inbox-briefing. Describe it as: “Prepare a concise inbox briefing when the user asks what needs their attention or which emails need a reply.” - Add the steps it should follow and the format it should return. The example below uses the same draft-only boundary as this guide.
- Select Create, then test it in Preview. Ask for a briefing, then ask an unrelated question. Check that it uses the briefing format only when appropriate.
You can also choose Generate with AI, describe the job, answer the follow-up questions, review the generated skill, and select Add to agent.
Start with this sample
Download the inbox briefing skill. In Skills → Upload a skill, upload this Markdown file. Studio also accepts ZIP packages containing SKILL.md and supporting files. This sample is an instruction-only starter; test it against your own connected tools.
Read what the sample skill does
1. Ask for a date range if one is missing.
2. Search and read only the connected test mailbox.
3. Check whether each thread already has a reply.
4. Group the results: needs me, waiting on someone else, no action.
5. Give a short reason and a source reference for each selected thread.
6. Draft reply text in chat when requested. Never send or change mail.
7. Report failed searches and missing facts instead of guessing.
Keep stable rules in the main instructions. Put the task-specific method in the skill. If you change the skill’s purpose, update its description too. That description helps the agent decide when to use it.
Microsoft: Skills overview · Create or generate a skill · Upload a skill.
Give a specialist agent one clear responsibility
Use a connected agent when a job deserves its own instructions, knowledge, and testing. For example, your Executive Assistant could ask a Policy Helper to check an expense question, then include its answer in a reply draft.
For the New experience used here, both agents must use the GitHub Copilot harness. The specialist must be published, configured as available to connect, and in the same environment. You must own it or have it shared with you.
- Build and test Policy Helper against an approved sample policy. Its job is to find the relevant rule and explain it with a source.
- Publish it and make it available to connect. Open your Executive Assistant’s Connected agents panel.
- Select Policy Helper. Describe when to use it: “Use for questions about the expense policy. Return the applicable rule, source, and anything the policy does not answer.”
- Select Connect. Test an expense question and a normal email-drafting request. Confirm the specialist handles the first and the primary assistant handles the second.
The routing description matters. Two specialists both described as “help with anything” make delegation harder to predict. A skill is enough when you just need another method inside the same assistant.
Microsoft: Connection requirements, setup, and delegation tests. Policy Helper is an illustrative build, not a preinstalled Microsoft agent.
Connect agents and workflows in either direction
Sometimes the agent decides it needs to run a process. Sometimes a process reaches a step that needs an agent’s judgment. Those are two different starting points.
Check which experience you’re using. Microsoft calls the New experience in this video the GitHub Copilot harness. Classic agents use the standard harness. Power Automate’s Microsoft Copilot Studio connector currently calls standard-harness agents, not GitHub Copilot-harness agents. Use a Studio workflow’s agent node for the latter.
A. Let your new-experience agent run a workflow
Example: ask your assistant to log a follow-up. A workflow checks the inputs, creates a SharePoint list item, and returns its link. The workflow owns the sequence of steps; the agent supplies the request.
- From Build → Tools, select Add beside the search bar, then Workflow.
- Keep the When an agent calls the flow and Respond to the agent nodes. Define inputs such as title and due date, then add the list action between them.
- Return a useful result such as status and item link. Save and publish the workflow, then return to the agent’s Build tab.
- In Preview, make one test request. Inspect the tool arguments and returned link, then open the actual list item. Also test a missing due date and a failed connection.
Microsoft: Add a workflow as an agent tool (preview). Available nodes and connection requirements depend on your environment.
B. Let a Studio workflow call your agent
Example: a new test email starts a workflow. An agent summarizes it and decides whether it needs a reply. A later step saves the result for you to review.
- Open Workflows and create a workflow with the appropriate trigger, such as a new email arriving in a test mailbox.
- On the Add panel, choose Agent → An existing agent. Select your published agent.
- In Message, explain this run’s job and insert the email’s subject and body using dynamic content.
- Use the returned response in the next step. Test the agent node and the full workflow before publishing.
For an agent used only by this workflow, choose New agent for this workflow. Configure its instructions and tools in that node. Structured output lets later steps use named fields, such as needs_reply and summary, instead of trying to interpret a paragraph.
Microsoft: Agent nodes, inline agents, and structured output.
C. Reuse a Power Automate flow with a classic agent
If you already have a working Power Automate process, start from a copy so you can keep its original trigger intact. This route applies to standard-harness agents.
- Put the flow in a solution in the same environment as the agent. A solution is the Power Platform container used to manage related components.
- Use When an agent calls the flow as the trigger and add Respond to the agent. Define the inputs the agent supplies and outputs it receives.
- Set Asynchronous response to Off. The response must return within the documented 100-second action limit.
- Publish the flow. In the classic agent, open Tools → Add a tool → Flow, select it, then Add and configure.
For a long approval process, return a request ID and “pending” status promptly, then continue the remaining work after the response step. A queued request is not a completed approval.
Microsoft: Prepare an existing flow and handle longer work · Add the flow to an agent.
D. Call a classic agent from Power Automate
In a cloud flow, add Microsoft Copilot Studio → Execute Agent and wait. Connect your account, select the published standard-harness agent, and pass the request in Message. Later actions can use the returned answer. For the new-experience agent in this video, use route B instead.
Microsoft: Call agents from Power Automate and current harness support.
Reusing a flow and converting its billing are separate decisions. Microsoft also offers conversion from a Power Automate flow to an agent flow. That conversion changes it to Copilot Studio capacity billing and is one-way. You do not need to convert a working flow just to understand these patterns.
Microsoft: Agent flows and conversion.
A useful next build
Keep your Executive Assistant’s first job small: prepare the briefing, use one skill for the format, and call a “Log follow-up” workflow only when you ask. Add a policy specialist later if you repeatedly need policy answers. Test each addition against a known example before connecting the whole process.
If your screen looks different
I don’t see New experience or the same model.
Check your organization, environment, and model permissions. Microsoft changes labels and rolls out features over time. The links in this guide point to the corresponding current documentation. Ask your administrator which experience is available to you.
The tool connects, but it doesn’t find the right mail.
Check the connected account, folder, date range, and search terms. Open the Preview activity trace and confirm a tool actually ran. Test against one known message before broadening the search.
Publish is blocked or the agent isn’t visible to colleagues.
Read the publish dialog’s specific failure. A missing field, channel policy, licensing limit, or sharing approval needs its own fix. A successful publish does not grant every colleague access. Test with an intended user in the selected channel.
Do I need memory and several agents?
No. Build the one useful job first. Add memory for a preference that should carry across conversations. Add a specialist when it has a distinct job that your primary agent should delegate.
Why can’t Power Automate find my new-experience agent?
The Microsoft Copilot Studio connector does not currently support GitHub Copilot-harness agents. Use a Studio workflow with an agent node. For a classic agent, also check that it is published and you selected the right environment.
Is a skill the same as a tool or a connected agent?
No. A skill packages a method, a tool provides an action, and a connected agent is a separate specialist. The Markdown skills in this guide are also different from Azure Bot Service skills described in classic-agent tools documentation.
Start with one inbox job.
Get the agent to find the right thread, explain why it matters, and produce a draft you would actually use. That gives you something concrete to improve. Keep the same test messages as you change its model, tools, and instructions.
Open Microsoft Copilot StudioOfficial Microsoft documentation checked 2026-09-15. This independent Wasser AI guide follows Robert’s video and adds documented extension patterns. Example agents, workflows, and the sample skill are starting points to build and test in your own environment. Product names and interface labels belong to Microsoft.